How to set up multiple schemes & configurations in Xcode for your React Native iOS app


Having different configurations & schemes allows you to change your app’s API keys, set debug flags, assign backend server endpoints, and create any other custom settings that differ between development and production. Once set up, schemes can be used among all of the developers who work on the app, and will allow for a much more stable deployment process. There are a ton of solutions described in various blog posts to this problem. We looked at plenty, but at the end of the day, custom build configurations were the only way to satisfy all of our requirements.
If you’re reading this, it’s likely you fall under the JS-developer-who-is-now-developing-mobile-apps-and-has-no-clue-what-they’re-doing category. Kind of like me. Unfortunately this tutorial will not cure you, but it will help you get past the hurdle of setting up different Xcode schemes so you can easily swap between build configurations.
Here at ZeeMee we use React Native in production for iOS (and soon for Android) and overall it has been a HUGE win, but getting past the configuration hurdle sucked, so to lessen the suck we’re sharing our solution with the world.
As a bonus, at the end of this tutorial we provide a fix to the difficult problem of syncing your Xcode build configurations throughout any Pods you have installed via CocoaPods (step 5).
Let ‘er rip
Step 1 — Create a new configuration
- Go to the file viewer in Xcode & click on your project file.
- On the topish left of the view that just opened (underneath the back/forward arrows), check to make sure you have the project file selected.
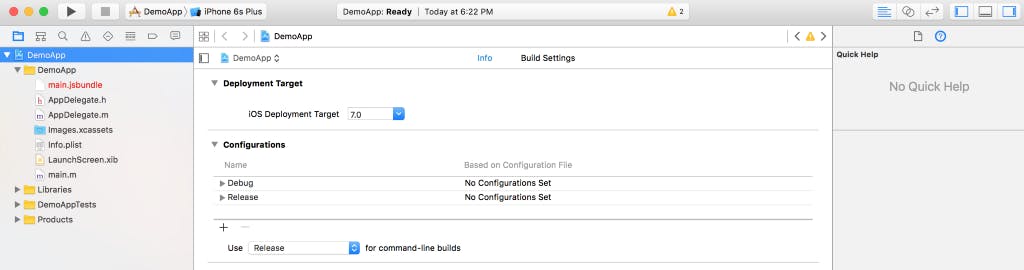
- Select the Info tab if it’s not already selected.
- Under the Configurations section, press the + button. Select Duplicate Debug Configuration.
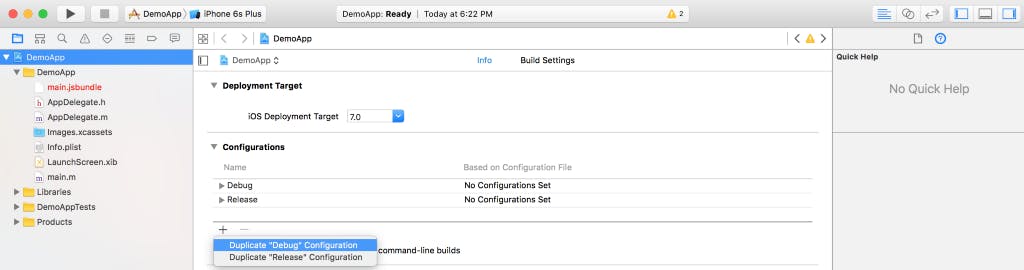
- Name your new configuration Staging Debug
- Create another configuration, but this time Duplicate “Release” Configuration and name it Staging Release
The idea here is to create a Debug and Release version for each configuration you want to add (see next paragraph), and then at the end, not use the regular old Debug & Release.
i.e. ZeeMee has 8 total configurations for our iOS project: Development Debug, Development Release, Staging Debug, Staging Release, PreProduction Debug, PreProduction Release, Production Debug, and Production Release.
Step 2 — Assign settings to the new configuration
- We’re going to create a configuration variable that will allow your configurations to have different values at run time.
- Go back to the topish left where I told you to select your project file from in step 1, but this time select your apps demo target under Targets
- Select the Build Settings tab

- If you scroll down to the very bottom of the build settings, there is a section called User-Defined. This is where your configuration variables will be added and set.
- Click the + towards the top of the view and add select Add User Defined Setting

- Name this setting SERVER_URL
- Click the arrow to the left of your newly added build setting variable and you’ll see the four configurations.
- Set the value for Staging Debug to stagingserverurl.com
- Set the value for Staging Release to stagingserverurl.com
- Yes, they’re the same.
- Leave Debug & Release blank
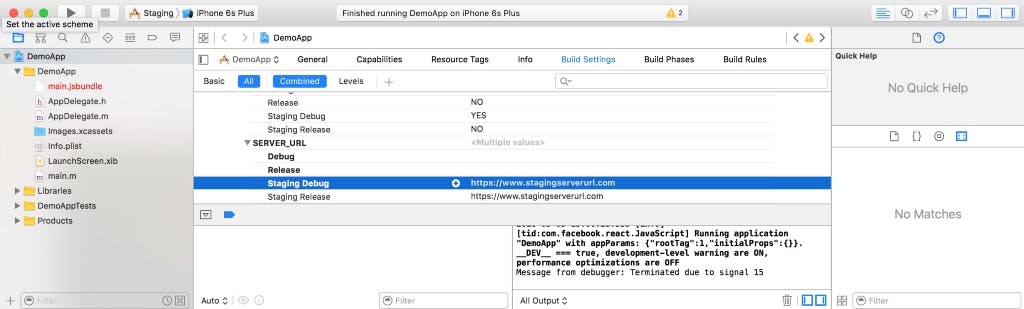
- The reason we create a Debug and Release version for the staging environment is because Debug and Release do different things at build time.
Step 3 — Create a scheme for the new configuration
Schemes are Xcode’s way of allowing you to select the configuration you want to run by the click of a button.
Let’s create a Staging scheme.
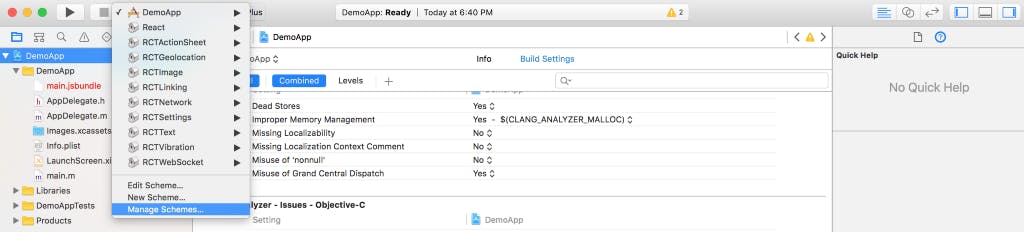
- Click the Scheme drop down and select Manage Schemes
- Click the + button to the lower left of the popup. Create a Scheme with your app’s target selected. Name it Staging.
- After it’s created, make sure to check the Shared checkbox in the right most column of your new Staging scheme. Also, if you want, you can uncheck the Show column of all of the other schemes, which won’t delete them, but will cause them to shockingly not show up.
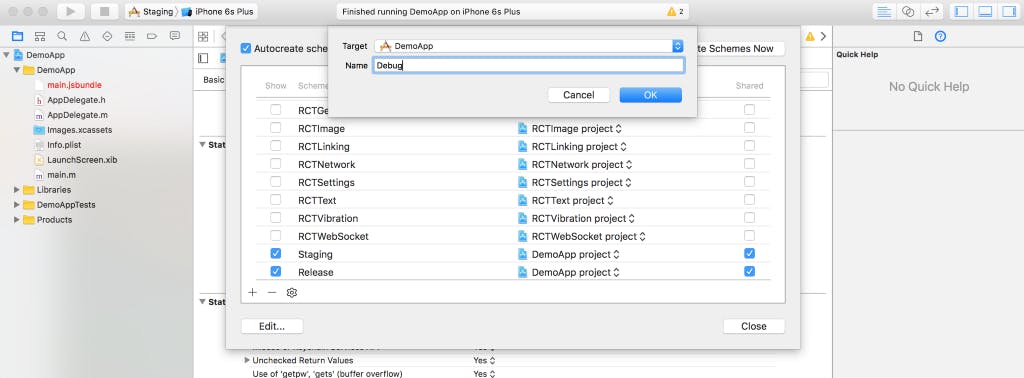
- Close the manage schemes popup, and now when you click the scheme selection you’ll see your new Staging scheme.
 Now we need to assign the staging configurations to this new scheme.
- Select the staging scheme, and then open the scheme selection dropdown again. This time press Edit Scheme…

- Click the Run step and change the build configuration to Staging Debug
- Change the build configuration for Test & Analyze to Staging Debug
- Change the build configuration for Profile & Archive to Staging Release
At this point, when you run the Staging scheme it takes a lot longer to build, and when the build finishes, your debug tools are gone! We will address this now.
Good job, you finished the easy stuff. Now it starts to get meaty.
Unfortunately it seems as if Steve Jobs had not used Xcode before reciting his famous quote about Apple products: It just works…
Step 4 — Telling React Native to build in debug mode
Even though we created our Staging Debug configuration off of the original Debug configuration, React Native’s build script still doesn’t recognize it as a debug configuration… Turns out any configs with names that don’t === Debug will run as release. That’s not what we want, so we are going to alter this script to run any configuration who’s name matches *Debug as debug.
In short, this is the first step to re-enabling the React Native debugger tools and making debug builds take less time (skip the bundling). FEAR NOT… When you want to submit an archive to the app store or run your app on a physical device, the right thing will still happen.
TIP: Don’t do this step in Xcode… instead do it in your favorite text editor.
- In the top level of your react native project (the straight up top level, outside of the ios directory) create a folder called scripts.
- In this folder, we’re going to create a new file called react-native-xcode.sh
- Copy and paste this code into the file and save it. It is a slightly altered version of the react-native-xcode.sh script that ships with React Native. medium.com/media/0e12b31043cfec8afffa41b52f..
There are only 2 changes from the original: The first change is on line 16. The original line matched the build configuration “Debug” exactly. We changed this to be a wildcard match. All of our debug build configurations end with the text, “Debug,” so this ensures it still matches when appropriate. The second change was simply due to the fact that this script no longer lives in node_modules/react-native/packager/, so that path had to be updated in order to be accurate.
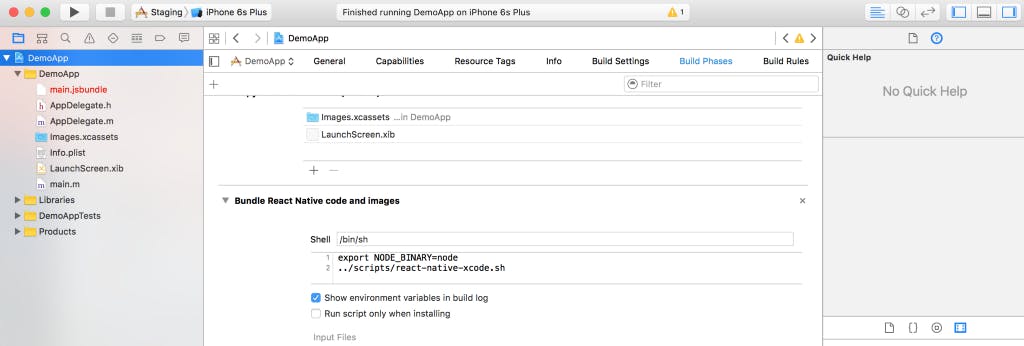
- After this, go into Xcode, click your project file, and select the Build Phases tab
- Under the Build React Native code and images section, alter the script to
export NODE_BINARY=node
../scripts/react-native-xcode.sh
It should look like this:
Step 4.5 — Installing Ruby
We need ruby to run one of the custom scripts we’re about to add. The easiest way to install ruby is with brew. If you don’t have brew, you can get it at brew.sh
$ brew install ruby
As of writing this blog post, I use version 2.2.4. It does not work with lower versions, and I can’t guarantee it will work with higher versions.
Step 5 — Becoming a wizard
This is where the magic happens. In this step we are going to set up a script that will sync your current build configuration with the rest of your iOS project, including any of your pods installed via CocoaPods. We are going to do this by adding a custom post-install script to package.json.
TIP: Close Xcode before doing this step. Instead, use your favorite text editor.
- In the scripts directory you created in Step 4, add a new file called sync-build-configs.rb
- Paste this code into that file and save it: medium.com/media/2123f89c568e9d937bcc24431c..
There are some extra things I left in here that are specific to our project. Feel free to take them out if you’re not using them and really don’t want them there. They will not hurt you if you’re not using them though.
- Create another file in the scripts directory called build-config-mappings.yml
- Paste this snippet into that file and save it
:debug: — Staging Debug If you have your own custom debug configurations, you should add them here as well.
- Now open package.json (Which lives in the top level of your React Native project directory)
- In your package.json, add these two lines to the “scripts” object
“fix_react_xcodeproj”: “ruby scripts/sync-build-configs.rb”,<br>“postinstall”: “npm run fix_react_xcodeproj” - Your package.json should now look something like this (if it’s a new project)
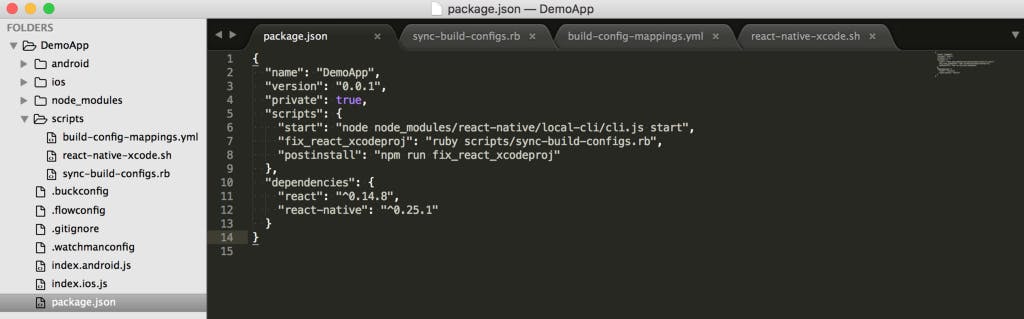 On the left side of this screenshot you can also see the scripts directory and the 3 files we’ve added to it (two from this step and one from step 4)
- Open a terminal to the root of your React Native project and run
rm -rf node_modules/ - Then run
npm install - Watch to make sure the post-install script didn’t fail. If it did, you likely don’t have the correct version of Ruby installed (I use 2.2.4).
- Open Xcode. In the top menu select Product > Clean
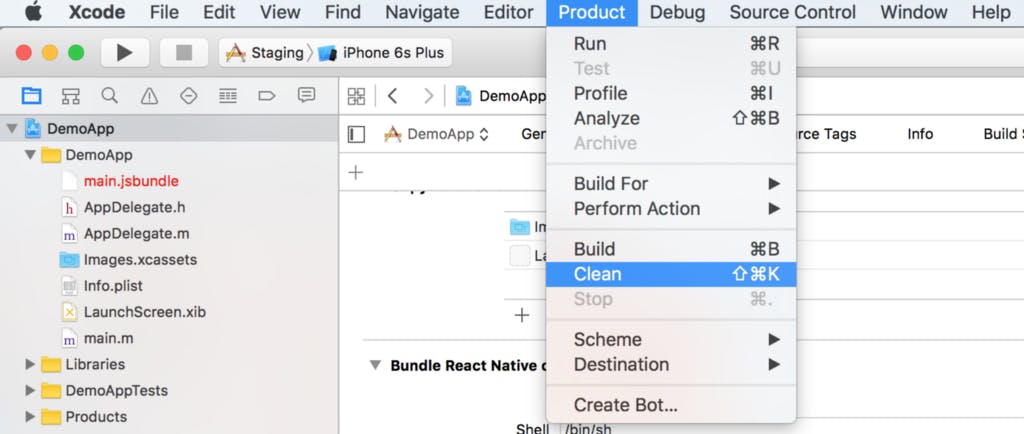
- Make sure your Staging scheme is selected and RUN THIS PUPPY
 Wallah. You’re now running a custom configuration and stuff works.
Step 7 — Using our custom configuration variables
We have our schemes running our configurations, but how do we use the variables that we set?
First, we need to add it to Info.plist.
- Open Info.plist
- Create a new key called SERVER_URL
- Set its value to $(SERVER_URL)

- We can access this at run-time in AppDelegate.m by using these 2 lines of code:
NSString *serverUrl = [[NSBundle mainBundle] objectForInfoDictionaryKey:@”SERVER_URL”];<br>NSLog(@"%@", serverUrl);
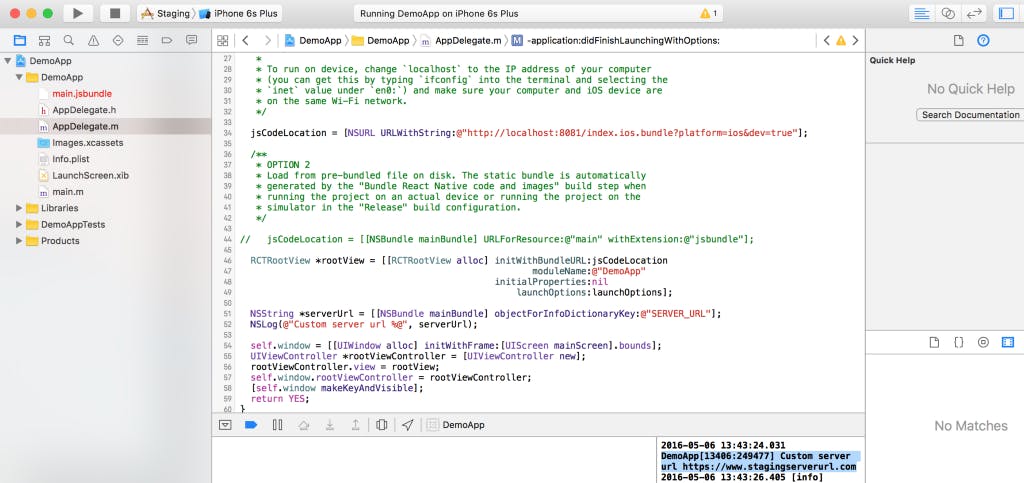 After re-running the project, you can see that the SERVER_URL was logged on the bottom right.
SAWEEEEEEET! Mission accomplished.